Here’s my take on the low-light capabilities of the GoPro Hero 4 in general. Photo- and video-wise. I can only speak for my Hero 4 Black Edition but I assume it would be the same for the Silver and Standard Edition.
The following are general considerations.
Differentiation between Still Photos and Video Mode
In Photo mode or Night-Time-Lapse mode you can achieve really nice results because you (resp.the camera) have more flexibility regarding shutter speed.
In Video mode the camera is bound to the frame rate you have set. E.g., if you are shooting in 30 fps the camera will actually take 30 images (at the given resolution) per second. That means the shutter speed can’t be slower than 1/30 of a second.
From your still photo experience you might know that 1/30 of a second is not slow enough to let enough light through the lens for night shots.
Consequently, shooting video at 24 fps should be slightly better and shooting at 48 or 60 or higher should result in worse video shots. But that’s theoretical.
Shooting at night in 48 has no advantage over 24 or 30 unless you want to slow down your video later in editing mode. I tested in video mode in a very dark scenery (only 1 street light 50ft away from me) first in Protune mode at setting ISO 1600 and compared that to Protune OFF which leads to an automatically chosen ISO 6400 because of the darkness.
The ISO 6400 video is OK lit but very, very noisy. The ISO 1600 video was overall way too dark but was noise-wise way better. Both settings couldn’t convince me, but again, the scenery was anyway very dark. For well lit streets an ISO 1600 should be the better solution over the brighter but noisier ISO6400. I would always try to go with the lowest ISO that still does the job. The GoPro phone app is the place where I check the overall situation before changing settings.
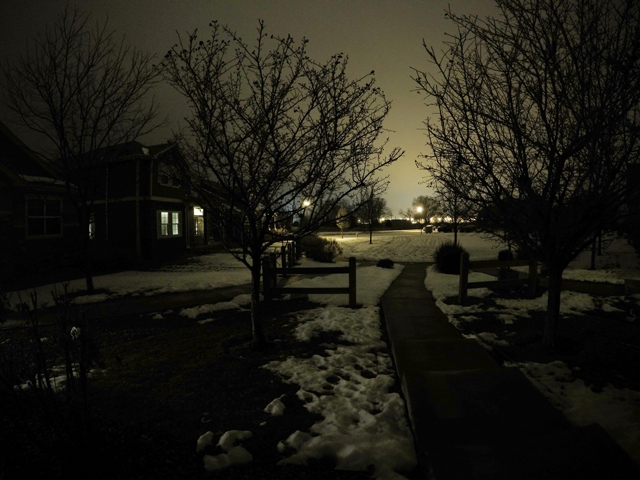
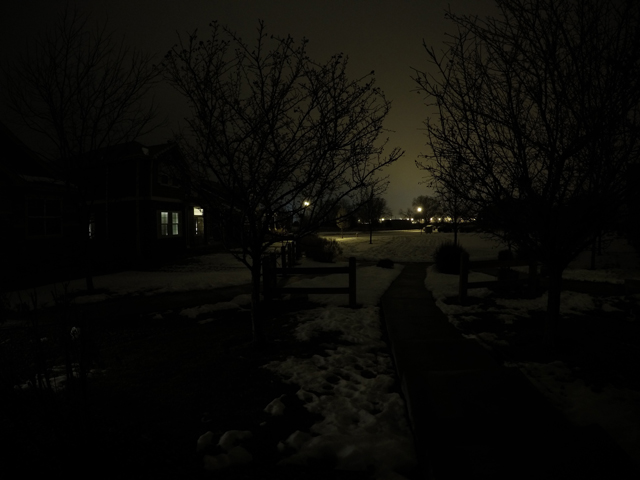
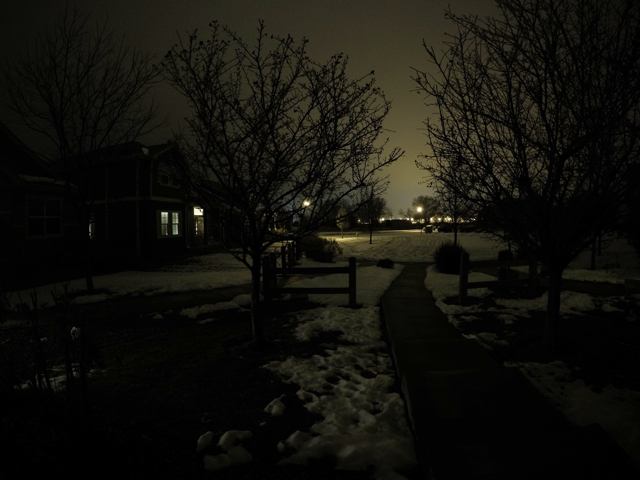
Following a PHOTO NIGHT SHOT. Protune-ON, ISO limited to 200, and SHUTTER: auto.
The first image is the original photo out of the camera, the 2nd is post-edited with exposure +1ev, the 3rd post-edited with exposure +2ev. Looks pretty realistic for the dark area I shot the photos. The actual night scene as I saw it was between the Original and the +1 eV version. More detailed Photoshop work could make the photo even better and smoother.
Video mode: How to remedy low light situations?
Above explanation tells us that the camera can’t go slower because of the set FPS rate. But the camera has the option to decide on a different ISO rate. ISO defines the light sensitivity of the sensor. The higher the number the more sensitive is the image sensor with regard to detecting light.
Theoretically you would think that bumping up the ISO would do the trick, but the downside of high ISO’s is the digital image noise that is introduced at the same time. ‘Noise’ is a synonym for grainy pictures. Rule of thumb: the lower the ISO the better the image quality and vice versa, the higher you go with ISO the noisier the photo becomes.
The GoPro Hero 4 offers a standard video mode and a Protune mode.
In Standard mode (equals Protune Off) the camera decides for itself what to do in what situations, i.e. it makes e.g. decisions regarding the ISO setting. For low-light situations it can go up to ISO 6400 which is the highest sensitivity the GoPro Hero 4 offers.
That will achieve that you can actually pick up very dark scenery but at the ‘price’ that the movie is in my opinion unbearable grainy, noisy. It just doesn’t look good anymore.
Protune mode
Setting Protune ON means that you have more settings available. Among them is a setting that allows to cap the ISO value the camera can choose.
If you limit e.g. the ISO to 1600 (which is the next available setting below 6400) you will notice an improved image quality. Less noise. But also less illumination of the scene. May be it is even too dark in situations where the lighting is very sparse.
My conclusion is that it becomes very difficult to get good footage when it is almost pitch black outside, e.g. when there’s only one street light out there and you are not right under it. Either I can barely see anything on the video OR with a ISO 6400 setting I have too much noise.
But with e.g. well lit streets in cities or sceneries with several light sources the camera can achieve pretty good results.
I prefer to set Protune ON just for the reason that I can control the ISO and make some test shots to see which ISO works best. There are way more settings that become available once you turn on Protune mode.
The ‘LOW LIGHT’ setting in video mode
The Hero 4 Black (and I don’t know about the Silver / and Standard) has also another remedy option: The LOW-LIGHT setting in VIDEO MODE.
In the beginning I explained that the camera is bound to the set FPS rate and therefore the shutter speed stands in direct relation to the FPS rate.
With the LOW LIGHT setting ON there is a workaround for the camera: The camera automatically adjusts the FPS to achieve the optimal exposure and best results. In plain words: even if you set 48 fps the camera reserves the right to go lower, maybe 30 fps or 24fps. I didn’t find the exact specs or what agorythm the camera utilizes to determine the temporary fps but in the end it doesnt matter. Fact is, it can slow down the frame rate and gives itself some more time to capture light.
If you wonder why you don’t see the LOW LIGHT settings in all situations on your display, the answer can be found in the manual: Auto Low Light is not available for 240 fps or 30 fps and below. AND THAT makes sense because for 30 or lower it’s not suitable anymore to slow the frame rate further down. And for 240 fps? Likely because the only meaningful reason to go with 240 fps is that you want extreme slow motion and therefore the camera doesn’t want to interfere with that intent. That is what I am guessing.
The LOW LIGHT setting is more made for situations where you transition from good lighting situations temporarily into low light situations like e.g. driving in full sunlight and entering dark forest and back into bright light. LOW LIGHT gives the camera some flexibility and therefore the DEFAULT value is ON.
If you are doing night scene video and you stick to 24 or 30 frames per second FPS rates it will not do a thing for you. If you would shoot at 48 or 60 FPS it will probably slow down the FPS to allow for slightly slower shutter speeds.
NIGHT LAPSE mode
The Hero 4’s NIGHT LAPSE mode is a way to produce great quality time lapses. NIGHT LAPSE vs (DAY) TIME LAPSE allows you to control the shutter speed. The options for this setting are auto (up to 2 seconds), 2, 5, 10, 15, 20 or 30 seconds. The default setting is auto.
If you also turn PROTUNE ON you can also limit the ISO setting. Technically the GoPro 4 Hero has ISO 800 as the limit for photos. In comparison, in VIDEO mode iit goes up to ISO 6400.
It seems clear why NIGHT LAPSES can look so great as we can find out on YouTube in many examples.
Available intervals for Night Lapse range from 4 seconds to 60 minutes. The Continuous (default) settings synchronizes the Interval to match the Shutter setting.
And of course your Interval cannot be lower than your shutter speed: if your shutter is open for 10 secs you cannot shoot an image every 5 secs, right?
So, the NIGHT LAPSE (in the end) creates a video, correct, however, it is not bound to a fast FPS rate like in video mode. In NIGHT LASPE mode, e.g. if you set your interval to 20 secs you technically shoot at 1 frame per 20 secs which is 20 times slower than shooting at 1 FPS which is subsequently 30 times slower than a regular 30 FPS. It makes clear that the camera has plenty of time in between images.
The ISO setting (available in Protune mode) should be as low as possible for the given night shot in order to reduce noise. What the best balanced settings (ISO, SHUTTER SPEED) are has to be determined by some test shots. Or by watching some Youtube examples where the authors tell us what they had used for a given situation. That should be a good starting point for your own projects.
![RGB illumination demonstrated: Red, green and blue lights showing secondary colours with white as FFFFFF [en:User:Bb3cxv, CC BY-SA 3.0 http://creativecommons.org/licenses/by-sa/3.0/, via Wikimedia Commons]](http://www.frankschrader.us/wp-content/uploads/2021/04/wikimedia-RGB_illumination-256x256.jpg)

great explanation. thank you so much!
Excellent. We understand. Thank you!
Why is there no manual shutter settings in video mode, according to the manual there should be one?
[…] http://www.frankschrader.us/2015/01/gopro-hero-4-low-light-setting/ […]
What setting do you recommend for Night lapse on the H4 Silver?
Good article
I’d like to add when shooting in video with a go pro the actual shutter speeds will probably be closer to this
24fps=1/50
30fps=1/60
60fps=1/120
2xfps is usually standard and I doubt go pros auto setting strays too far off as this would create more jagged footage (couldn’t think of a better word). Just figured these numbers would be useful to emphasize how poorly the higher frame rates will do in low light settings.
I also shoot with the 4 silver. iso 400 20 second exposure https://www.youtube.com/watch?v=DxfI_4CZGHg