This article talks about how Lightroom Classic CC (the desktop version) handles the Editing information about images. We talk about the catalog, Metadata, XMP files, RAW data, raw files and JPEG files. Also briefly about portability of Editing information across different image editing or organizing software. I will explain why the catalog is so important and why you need to know about Metadata to keep you editing information safe.
Even if this article was written when Lightroom Classic CC is the latest version of the software it is probably valid for all previous and coming versions. The Metadata & XMP file section is also valid for Adobe Photoshop.
In the following I will use the abbreviation LR for Lightroom.
Let’s start:
LR is a image/video organizing software and image editing software. LR is not meant to edit videos, at least not in the sense of what you can do with specialized video editing software. For videos you can just extract frames or apply an effect, but the latter is something I would not necessarily do in LR when you have other video editing software.
LR allows you to import your images and videos from available locations without the need to move those files away from those storage locations — you can keep the files in their original location but you can also move the files during the import process to a new location if you wish. The important thing here is to note that LR creates a catalog, a kind of repository, and includes all image and video information and location information in that catalog.
A catalog is LR’s heart. You must take very good care of it because if it gets corrupted you might lose all your editing work!
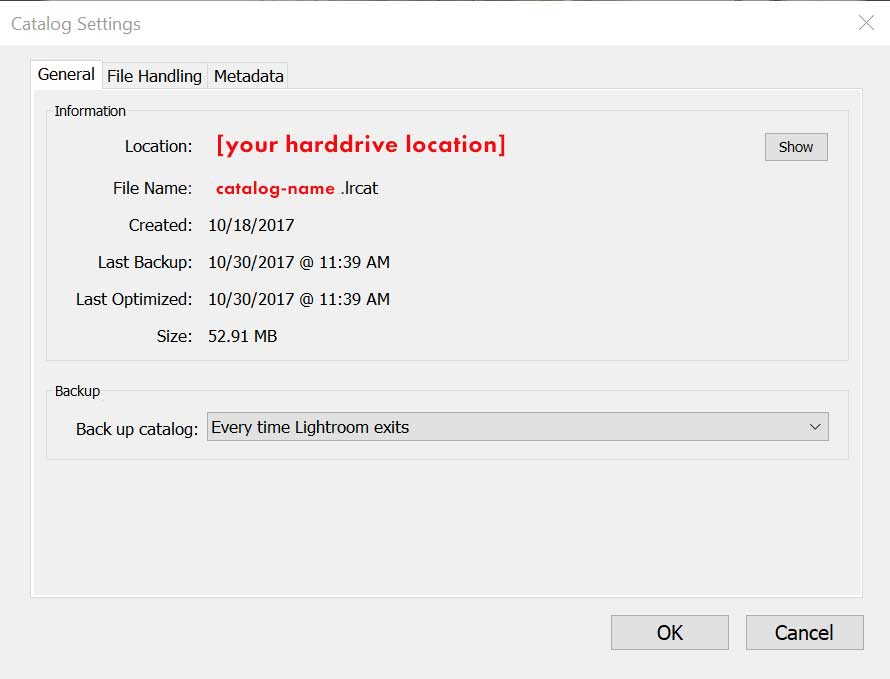
Taking care means a) to backup your catalog as often as possible. Go to EDIT->Catalog Settings… -> Tab General and there in the ‘Backup’ Dropdown box select ‘Every time Lightroom exits’. That will trigger LR to ask you (in a dialog that pops up) every time you exit the software to decide whether you want to backup the catalog or not. Note that the default location is a local file directory right next to the catalog and that this backup is also gone if you have a harddrive crash. You can change that backup location to another harddrive if you wish.
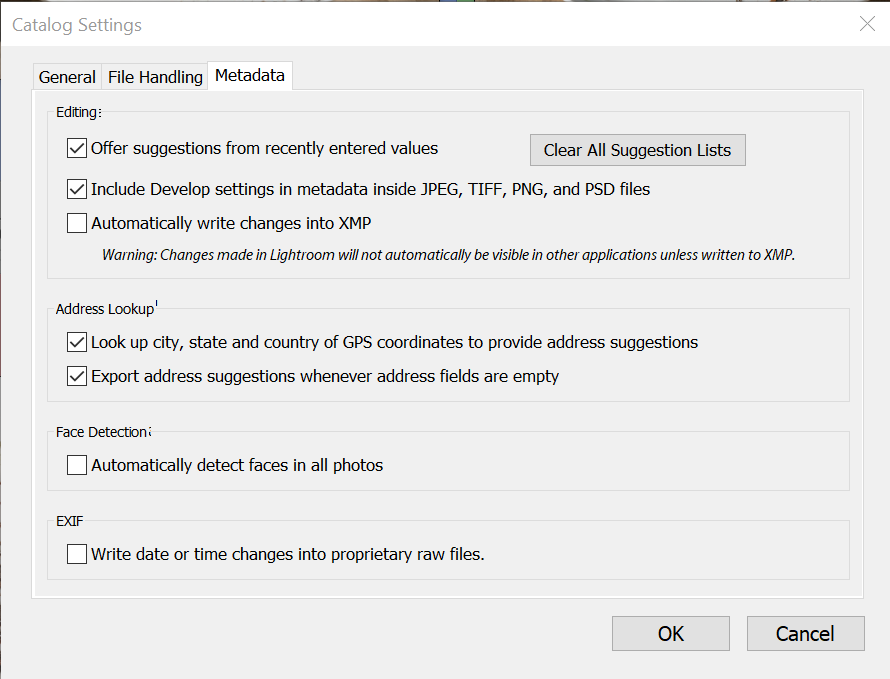
Under the Tab Metadata you can go with the Defaults like in the screenshot above OR make a change and select ‘Automatically write changes into XMP’. In the following I am describing what XMP is and how Metadata is handled. For now, just note that it might have a performance penalty if you automatically write changes into XMP especially if you deal with large files or if your images reside in the cloud with automatic syncing.
XMP is the abbreviation for Extensible Metadata Platform. XMP is an ISO standard for the creation, processing and interchange of standardized and custom metadata for digital documents and data sets. The information is written in clear text, human-readable and machine-readible format which is called XML. Further below is an excerpt of such XMP file.
Non-Destructive Image Editing in LR
By default you are editing images in LR in a non-destructive way meaning the modifications and effects are not applied to the image directly. If that would be the case you would never be able to reverse the modifications.
LR remembers the edits by keeping that specific information in its catalog.
A change to an image is indicated by an Arrow icon in the top right corner of the Library view of that particular image.
The type of change is marked in the lower right corner with the help of different icons: here in that case the ‘Pen’ icon states that there are keyword assigned to the image and the ‘+-‘ icon states Editing adjustments to the image.
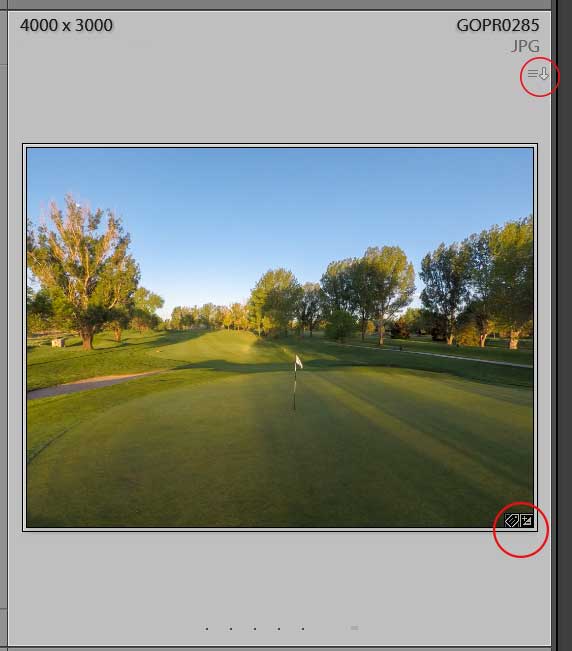
Any changes to the image like Editing or actions like Rating, Assigning Keywords are stored in the LR catalog — the image remains untouched. That’s non-destructive editing.
However, if the catalog integrity gets damaged or the catalog becomes unreadable, all your modifications are gone for good. That’s why it is imperative to keep always several backup copies.
But there’s another action you can take: the mentioned Arrow icon is the indicator that something had been changed for that image. By clicking the Arrow icon you can save the Metadata (== describes all changes in a reproducible way) to the harddrive disk. That is the manual way of doing that. If you want that done automatically you must select the checkbox (see screenshot further above) ‘Automatically write changes into XMP’.
For JPEG files (and TIFF, PNG, PSD files) the information is written directly to the JPEG file without modifying the JPEG itself: the image remains the original one, even if you had e.g. changed the Exposure or Sharpness, or even if you had converted it to black & white.
The descriptive Metadata information is written into an informational section of the JPEG file (or the other mentioned file types). For camera Raw files, which are proprietary file formats of the camera manufacturer, the Metadata cannot be written into the file because Adobe doesn’t want to mess with proprietary file formats which makes sense. Therefore the Metadata is written to a sidecar file, which is a file with the file extension .XMP.
It looks like following Metadata excerpt for a file where I changed the EXPOSURE to 2.52:
<x:xmpmeta xmlns:x="adobe:ns:meta/" x:xmptk="Adobe XMP Core 5.6-c143 79.161356, 2017/09/07-01:11:22       ">
   <rdf:RDF xmlns:rdf="http://www.w3.org/1999/02/22-rdf-syntax-ns#">
     <rdf:Description rdf:about=""
           xmlns:xmp="http://ns.adobe.com/xap/1.0/"
           xmlns:aux="http://ns.adobe.com/exif/1.0/aux/"
           xmlns:photoshop="http://ns.adobe.com/photoshop/1.0/"
           xmlns:xmpMM="http://ns.adobe.com/xap/1.0/mm/"
           xmlns:stEvt="http://ns.adobe.com/xap/1.0/sType/ResourceEvent#"
           xmlns:dc="http://purl.org/dc/elements/1.1/"
           xmlns:xmpRights="http://ns.adobe.com/xap/1.0/rights/"
           xmlns:exifEX="http://cipa.jp/exif/1.0/"
           xmlns:crs="http://ns.adobe.com/camera-raw-settings/1.0/"

           xmlns:lr="http://ns.adobe.com/lightroom/1.0/"
           xmlns:tiff="http://ns.adobe.com/tiff/1.0/"
           xmlns:exif="http://ns.adobe.com/exif/1.0/">
         <xmp:CreatorTool>10.3.1</xmp:CreatorTool>
         <xmp:ModifyDate>2017-05-13T06:13:59</xmp:ModifyDate>
         <xmp:CreateDate>2017-05-13T06:13:59.099</xmp:CreateDate>
         <xmp:MetadataDate>2017-10-31T04:55:28-06:00</xmp:MetadataDate>
         <aux:LensInfo>399/100 399/100 9/5 9/5</aux:LensInfo>
         <aux:Lens>iPhone 7 back camera 3.99mm f/1.8</aux:Lens>
         <photoshop:DateCreated>2017-05-13T06:13:59.099</photoshop:DateCreated>
         <photoshop:LegacyIPTCDigest>63BC009343360E46879EA248DBBDA6E9</photoshop:LegacyIPTCDigest>
         <photoshop:ColorMode>3</photoshop:ColorMode>
         <photoshop:ICCProfile>Display P3</photoshop:ICCProfile>
         <xmpMM:DocumentID>B06D4583CB030884F067264966AD3AE2</xmpMM:DocumentID>
         <xmpMM:OriginalDocumentID>B06D4583CB030884F067264966AD3AE2</xmpMM:OriginalDocumentID>
         <xmpMM:InstanceID>xmp.iid:234197f8-5ddf-0a4e-a6b7-13edf6d80bcd</xmpMM:InstanceID>

… [MORE INFO THAT IS NOT SHOWN HERE IN THIS EXAMPLE]

         <crs:Version>10.0</crs:Version>
         <crs:ProcessVersion>10.0</crs:ProcessVersion>
         <crs:WhiteBalance>As Shot</crs:WhiteBalance>
         <crs:IncrementalTemperature>0</crs:IncrementalTemperature>
         <crs:IncrementalTint>0</crs:IncrementalTint>
         <crs:Saturation>0</crs:Saturation>
         <crs:Sharpness>0</crs:Sharpness>
...
         <crs:Exposure2012>+2.52</crs:Exposure2012>
...
         <crs:Contrast2012>0</crs:Contrast2012>
         <crs:Highlights2012>0</crs:Highlights2012>
         <crs:Shadows2012>0</crs:Shadows2012>
         <crs:Whites2012>0</crs:Whites2012>
         <crs:Blacks2012>0</crs:Blacks2012>
         <crs:Clarity2012>0</crs:Clarity2012>

… [MORE INFO THAT IS NOT SHOWN HERE IN THIS EXAMPLE]

     </rdf:Description>

   </rdf:RDF>

</x:xmpmeta>
The ADOBE namespace
It is worth to mention that all those Metadata that were written to the JPEG file exist as informational data which lives in an ADOBE namespace.
It starts right with <x:xmpmeta xmlns:x=”adobe:ns:meta/”
Then xmlns:crs=”http://ns.adobe.com/camera-raw-settings/1.0/” — That tells that the camera raw information live in a section that uses CRS tags.
And eventually that TAG CRS appears in the file and contains all the Editing info for the image. In our example: <crs:Exposure2012>+2.52</crs:Exposure2012>
A namespace is used to indicate that certain information is to be seen in a certain context, … in this case in an ADOBE context.
That doesn’t mean that other software can’t read this information but the question is if it will make use of that information. Technically other software companies can read 100% of the information, but normally they do NOT use the information. It would be an effort to translate the Adobe development settings into their own settings and results could easily vary. That’s why it is not popular to do that.
For example: if you edit a JPEG photo in LR and you convert it to black & white … that photo will still be displayed in color if you open it from your harddrive with the Windows Photo Viewer or Windows Paint. Same is valid for most other Image editors, UNLESS they intentionally want to be compatible with Adobe products. That is rare but possible.
E.g. other photo organizing software or editing software wants to appeal to ADOBE customers and wants to make it more tempting to use their software then they might offer to convert Adobe’s Metadata. But you should make sure to read the details of the Import procedure because the other software might offer to import Adobe Metadata but not 100% of the settings.
However, if you open any of your JPEG files (that has the Adobe Metadata written to it) in an Adobe product like Photoshop it will read the Metadata and use it (if you want to). Photoshop e.g. would ask you and present the RAW file plug-in.
I made that excursion into these more technical aspects because it helps to understand that it is not really easy to make a switch to another organizing or editing software even if you have a working LR catalog or if you had written your Metadata to disk.
For all camera raw files the above described Metadata handling is the same but the data itself is written to the sidecar file, a file with the extension .XMP and is kept separate from the original Camera Raw file.
Writing Metadata to disk
Why is it a good practice to write the Metadata also to your disk and not only keep it in the catalog? The answer is that you have the chance to use that image including all edits you made without having the LR catalog available. E.g. if you send the image to another editor. Or in case your catalog goes south and your backup copy is not existing or broken.
I chose to write Metadata manually to the disk just for the reason that I don’t like the constant file updates in the background when opting for ‘Automatically write changes into XMP’. If you do lots of edits to many files and those files are large then there’s a constant disk I/O happening. Also, I tend to edit my files on a disk that is automatically synced to the cloud and therefore I also create a constant upload in the background. Technically that is not a big deal if you have a Gigabyte connection but not everybody has that and you can end up with a bottle neck.
Hope that article could shed some light on how Metadata is technically handled and why it is important to keep your catalog and Metadata in good shape.
+++
Resources & Reference of mentioned and/or used software for this article
Adobe Lightroom / Photoshop CC: Trial versions of Creative Cloud Apps
or if you are just interested in Photography then Lightroom CC and Photoshop CC :
Lightroom as part of the Creative Cloud Photography
+++
Or check out some books on Amazon:
+++
Disclosure:
On my pages I might talk about products and provide a link to Amazon.com. As an Amazon Associate I earn from qualifying purchases a small commission, however, it does not increase the price of the product and it doesn’t cost you anything.
I am an Adobe Affiliate and by using above Adobe Links I might receive a small commission which helps running this website! As before, it doesn’t cost you anything!




![RGB illumination demonstrated: Red, green and blue lights showing secondary colours with white as FFFFFF [en:User:Bb3cxv, CC BY-SA 3.0 http://creativecommons.org/licenses/by-sa/3.0/, via Wikimedia Commons]](http://www.frankschrader.us/wp-content/uploads/2021/04/wikimedia-RGB_illumination-256x256.jpg)

