This article talks about creating a nice smooth SLOW MOTION in Adobe Premiere Pro CC with footage that is 48p, 60p, 120p or higher and it explains what TIMELINE to use for editing.
I want to start with a look at a) the footage and b) the timeline in the editing software:
a) the footage: 60p footage (or 48p, 120p, or higher)
The footage is the source material and establishes what you have at hand for editing and determines the maximum quality (motion-wise) for your project: e.g. 60p footage means the camera has shot 60 full frames (that’s progressive mode and is indicated by the ‘p’ in 60p) per second of action. 60 images (==frames) that document 1 second of action. 60p is the alternative way of saying 60fps.
THE MORE frames per second THE MORE motion in the scene was captured. E.g. if you aim your camera at a fast moving object that is passing by you need more images (== frames) per second in order to capture as many as possible positions of the object during the overall action.
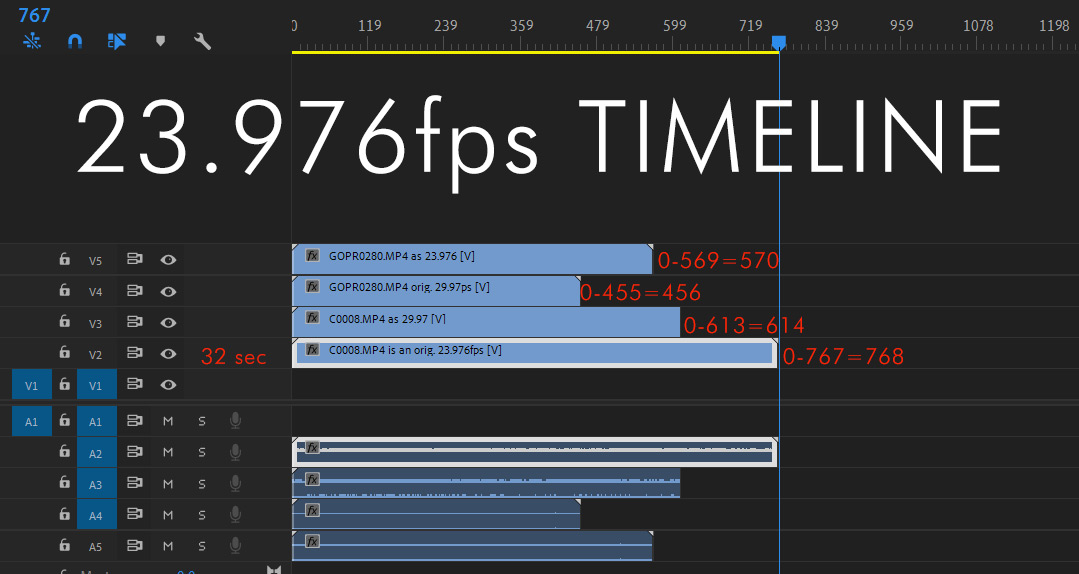
b) the Adobe Premiere Pro CC timeline
The editing timeline in Premiere Pro CC (and in other video editing software) specifies your TARGET outcome — common is 24 fps or for all things Internet / digital: 30fps.
24 fps is the classic movie picture setting and proponents say that it brings the typical (wanted) movie look to the table and that higher frame rates look too ‘real’. — I don’t know, but I believe it comes down what your project is about and what you are filming: a personal Hollywood short film or a documentation or sports video.
BTW, The Hollywood movie The Hobbit was shot in 48 fps and other movies go that route too — may be it is the evolution from silent films (at 16fps) to Classic Hollywood era (at 24 fps) to Hollywood reloaded (at 48fps)?
Coming back to the topic: for sure, the more frames you deliver per second the more realistic the motion.
A timeline edit with 30 fps is the de-facto-standard for today’s world if you create for the Internet or most common digital output. With the rise of 4k monitors and TV’s, fast processors, and newer devices in general that might change. Your output medium must support high frame rates and the real refresh rates are important (vs Marketing definitions) in order to really output all 60 frames or more per second.
Editing on WHAT TIMELINE?
You set the timeline to whatever your target video output should be — mostly 30 fps for real world scenarios or may be 24 for all those who aim at this classic movie look.
You can mix any source footage and then drop it on the timeline — you DO NOT destroy your 60fps footage once you drop it on a 30fps timeline — it is not downgraded, and you do not ‘loose frames’ while editing. You’ll have less frames in the rendered output though, just for the fact that on a 30fps timeline there’s only room for 30 frames per second and if you use 60 fps footage the editor keeps in mind that some frames later during rendering need to go.
However, during EDITING you still work with the underlying original 60 fps source and that means you can create slow motion whenever you want. You can make speed changes any time. You can verify in the project window panel that your source video footage retains its frame rate.
CREATING SLOW MOTION: how much can you slow down
The slo-mo rate depends on the source fps and the timeline fps: with a 60fps source on a 30 fps time line you can go 50% slo-mo without any loss of quality.
The formula is: timeline fps (divided by) source fps.
Reasoning: on a 30 fps timeline you have room for 30 frames (images) which create 1 second of output. During you video shoot with 60 fps you created 60 frames that captured that 1 second of action. You can distribute those 60 full images on the 30 fps timeline and you get 2 seconds of action, in other words the original action was certainly only 1 second long and playing it over 2 seconds means you get beautiful slo-mo.
120 fps source footage? you can easily distribute all your 120 frames to 4 seconds of output video, making it 4 times slower than the original: 30 divided by 120 equals 25% or 0.25.
You can certainly try to ‘stretch’ your footage even farther, but since you ‘need’ 30 fps on your timeline per second you would loose quality because the software would ‘guess’ how the missing frames would look like and that is called Interpolation. Basically ‘faking’ frames.
HOW TO DO SLOW MOTION ON THE PREMIERE PRO TIMELINE
Basically there are 2 ways:
a) do it on-the-fly: dropping higher fps source video on the timeline and changing the SPEED/DURATION setting for the clip
b) INTERPRETE the source video into another (slower) frame rate.
method a) Let’s assume you have a 30 fps timeline. You have 30 fps, 48 fps, 60 fps, and 120 fps footage in your project.
30 fps is what it is: real-world speed where your source equals your target speed. You can slow it down but not much in order to not loose too much quality.
Drop any higher fps source on the timeline. Let’s assume you drop a 2 seconds long 60 fps clip on the timeline. It will, not surprisingly, show also as a 2 second long clip. But you know that you shot 60 frames per second and so you right-click the clip and in the context dialog you left-click SPEED / DURATION. In the dialog box that pops up you type in 50%. You will notice that the clip length doubles. The available frames are distributed on the 30 fps timeline.
Make sure that ‘Frame Blend’ in the context menu was off (==not checked).
method b) Let’s assume you have imported a 60 fps source into the Premiere Pro project area. It shows as 60 fps (or 59.94) in the details view. Right-click that clip and in the opening context menu click MODIFY… and then INTERPRET
In the opening dialog you click ASSUME FRAME RATE and set it to 30 fps. Click OK.
Done.
Now, in the project area the details show that the clip is a 30 fps clip and the length has doubled.
The source file is still intact as you can verify by checking the file location and properties.
method c) ANOTHER WAY to INTERPRET footage is to use Adobe Media Encoder.
First import a source clip onto the stage. Then right-click that clip and then in the context menu you’ll see INTERPRET FOOTAGE…
Here in Media Encoder you can also change the output directory and file name and therefore actually create a new video file with that new fps rate. Once written to disk you can go to that location and find that the file has actually doubled its play length (assuming you went from 60fps to 30fps). It is actual slo-mo and plays as such.
CONCLUSION
Probably it is best to prepare your footage in your project (aka. INTERPRET it) before throwing it on the timeline. That allows in bigger projects to keep things organized. You could also duplicate the original footage and then apply the INTERPRET onto the copy and rename the copy to reflect the change (or color-code it).
In some scenarios you could also apply the on-the-fly method and drop footage onto the timeline — it is easy to use and you can experiment with different speed/duration settings. Your source clip is kept intact.
Keep in mind: whatever frame rate your camera is set to, a 5 second action will always be 5 seconds long unless you speed it up or slow it down for playback. This is important to know when you plan to use authentic audio with your clip, because you cannot just INTERPRET footage and keep the audio intact. If you need clip audio you should shoot the clip in the planned frame rate.
The camera’s fps setting, however, will determine what you can do with the clip later during editing. The higher the frame rate the better the slo-mo because you shot so many more frames and captured so much more motion of a moving scenery. Or while panning your camera.
Your timeline defines your target output. The fps rate of the timeline shall not be greater than the lowest source fps because you do not want interpolation (guessing of frames) to happen.
Resources & Reference of mentioned and/or used software for this article
Adobe Premiere Pro CC / After Effects CC: Trial versions of Creative Cloud Apps
Thanks, very helpful.