Ending up with footage that was shot at different frame rates is a real world scenario — to handle that in the best possible way is helpful to understand what happens to footage when the frame rate is changed — changed in either direction: e.g. 23.976 to 29.97 or vice versa or even higher frame rates to one of those frame rates. That is this article about. My examples are based on an Adobe Premiere Pro CC workflow. However, the principle and effects of changing frame rates should be similar in other software.
It’s always best to shoot your footage at the desired output frame rate unless you want to make use of slow-motion.
Every conversion from one frame rate to the other — unless it is intentionally a slow-motion footage — is not ideal, however, in many situations the fall-out is not noticeable or it is neglectable. It will strongly depend on the footage (and scene) you have shot whether you can get away with a conversion or not. Additionally, the algorithm behind the conversion (so to speak … the software which does the conversion) is relevant as well. In general, in my opinion any scenes that involve ‘panning’ are more difficult than others.
So let’s take a look at what happens if you have to work with a mix of video clips at different frame rates
For simplicity reasons the first part of this article will use examples with 24, 30 or 60 fps, however, the logic will apply to 23.976 / 29.97 / 59.94 as well. The detail part uses 23.976 and 29.97 frame rates for explaining the number of frames used.
First thing to mention is that a video clip that captures 10 sec of something will always be a 10 sec clip no matter in what frame rate it has been shot — because: the scene you were capturing was real-time 10 seconds. The difference among chosen frame rates will be that you captured more frames (details) within those 10 seconds: at a 30fps rate you have 300 frames but shot at 60fps you end up with 600 frames.
First scenario: let’s assume your project shall become a 30fps (or synonym for 29.97) movie:
Assumptions:
- a TIMELINE with a 30fps frame rate
- you have footage with 24fps, 30fps, may be 60fps and higher
- your clips are for this tutorial purpose all 4 seconds long
- you have imported that footage to Adobe Premiere CC without having done prior conversions
- you drop the 24fps clip on the timeline: the 24 fps clip has internally 4 sec x 24 frames == 96 frames.
After dropping it on a 30fps timeline it will still be a 4 sec clips (as we noted during the introduction) but the timeline needs you to provide 4 sec x 30 frames == 120 frames. The clip will be ‘stretched’ to 120 frames while still being 4 seconds in length. You can verify the 120 frames by changing (on your timeline) the display format to ‘frames’.
Result: the clip plays content in real time, your audio is still 4 sec long, but the video frames have been ‘blown-up’ like if you enlarge a small picture: there’s a certain quality loss. - you INTERPRET the 24 fps clip before dropping it on the timeline:
I duplicate the original clip in the project and get a copy which I rename to something that reflects the frame rate Interpretation I intend to apply: e.g. {original filename} as 30fps. Right-click the copied clip and choose Modify->Interpret…
In the dialog you set the new Assumed frame rate to: 30
You’ll notice that the clip length will be reduced — that’s because you have 96 frames which will last 96/30 seconds… aka a little over 3 seconds. Once you confirm the dialog box you’ll notice (in the project view) that the clip copy has now the desired 30 fps frame rate.
Now you drop that INTERPRETED footage on your 30 fps timeline and you get a 3+ seconds long clip, all original frames, however the fall-out is that your 4 seconds real life video capture is slightly compressed. Most likely not noticeable. But your audio will be not really ok anymore. - CONCLUSION: both ways might work for you. It’ll depend on your footage. If you need real-time and synced audio, you need to go with 1).
- Now, let’s drop 60fps footage on that timeline. As before, a 4 second clip will be still a 4 second clip — so, you are maybe ok: you still work (edit) on a 60 fps based clip but once you render (or preview) the timeline your original clip will be used only for every other frame. Depending on the scene you will either notice a not-so-smooth scene or you are happy with the result. It just matters if every other frame had (motion-wise) relevant information or not: e.g. fast panning at 60fps captures important stages (angles) of the pan and in theory you suffer a penalty if you are using only every other frame.
- Now you INTERPRET your 60fps footage before dropping it on the 30fps timeline: you will end up with a twice as long clip because in 60fps footage your 60 frames last for 2 seconds instead of 1. Now you drop interpreted clip on the timeline and you have a slow-motion result of 8 seconds. Of course, your audio is unusable like in the 24fps example because you interpreted the footage.
Overall conclusion:
In relation to your TIMELINE FRAME RATE: slower 24fps footage (when interpreted) looses audio and will be slightly shorter but should be ok. If it is not interpreted it’ll be real-time length but frames were added according to an algorithm. I don’t know which rules Adobe applies by default (like frame sampling, frame blending, or optical flow which are all available when Time Interpolation is applied) — may be the final decision for that is actually made in the EXPORT dialog where you can choose one of those three, but if that is the case it would be valid for all conversions in your movie and you still have no choice for individual clips. Let me know if you have gained insight into that question.
Faster footage can perfectly be used for slow motion purposes which is assumingly the common intention for fast frame rates. If you have footage that is not really fast but has to go on a slower timeline then the whole thing becomes problematic: like 30 fps footage on a 24fps timeline, see next EXAMPLE.
2nd scenario: let’s assume your project shall become a 24fps movie:
Assumptions:
- a TIMELINE with a 24fps frame rate
- you have footage with 24fps, 30fps, may be 60fps and higher
- your clips are for this tutorial purpose all 4 seconds long
- you have imported that footage to Adobe Premiere CC without having done prior conversions
- you drop the 30fps clip on the timeline: the 30 fps clip has internally 4 sec x 30 frames == 120 frames.
After dropping it on a 24fps timeline it will still be a 4 sec clips (as we noted during the introduction) but the timeline needs only 4 sec x 24 frames == 96 frames. The clip will loose in the final render 6 frames per second.
Result: the clip plays content in real time, your audio is still 4 sec long, but some video frames have been left out. If you reduce a still picture you normally do not notice the lack of information when pixels are omitted because everything gets smaller anyway. With video it is different and whether you notice the missing 6 frames per second or not depends again on your footage. In theory you will get away with that when there’s not too much motion in your footage. The more motion or panning the more noticeable the drop in frames. - you INTERPRET the 30 fps clip before dropping it on the timeline:In the dialog you set the new Assumed frame rate to: 24
You’ll notice that the clip length will become longer — that’s because you have 120 frames which will last 120/24 seconds… aka for 5 seconds. Once you confirm the dialog box you’ll notice (in the project view) that the clip copy has now the desired 24 fps frame rate.
Now you drop that INTERPRETED footage on your 24 fps timeline and you get a 5 seconds long clip, all original frames, however the fall-out is that your 4 seconds real life video capture is slightly prolonged (slow-motion). Most likely not noticeable. But again, your audio will be not really ok anymore. - CONCLUSION: both ways might work for you. It’ll depend on your footage. If you need real-time and synced audio, you need to go with 1).
- Now, let’s drop 60fps footage on that timeline. As before, a 4 second clip will be still a 4 second clip but for the final render lots of frames need to be dropped to get down to 24 fps. Depending on the scene you will either notice a not-so-smooth scene or you are happy with the result.
- Now you INTERPRET your 60fps footage before dropping it on the 24fps timeline: you will end up with a 2.5 as long clip and you have a slow-motion result of 10 seconds.
Overall conclusion
Conversions are never predictable — except for slow motion effects.
Watch out for footage that has faster movements or past pans because that footage is more vulnerable towards frame rate changes. With footage that has not much movement you should get away with either up- or downgrading frame rate speed. If applicable, you can also experiment with the 3 Time Interpolation methods:
- frame sampling (previous frame is duplicated to create the next missing one)
- frame blending (previous and next frame are blended in order to create the missing middle frame)
- optic flow (the algorithm guesses the in-between frames and creates them artificially)
Time Interpolation methods are used e.g. when somethin is stretched and frames are missing. Usually when you want to create a slow-motion effect but you do not have the necessary amount of frames in the original footage. You can experiment with the 3 options (frame sampling, blending, and optical flow).
Footage INTERPRETATION – what for?
When you interpret any footage for the specific timeline THEN you make sure to use all frames that were originally shot, however, you modify the clip length in either direction which results in a slow-motion or a speed-up of the scene. If you do not INTERPRET footage the original length of the clip will be kept intact when you drop it on the timeline, audio will be unaffected, however, frames are dropped or added depending in which direction the frame change goes.
As always, nothing comes for free 🙂
INTERPRET footage vs. SPEED change (Adobe Premiere Pro CC)
You can do it either way: the result of both methods is the same. The magic numbers are 80% or 40% speed reduction.
30fps footage slowed down at 80% makes it 24fps speed.
60 fps slowed down 80% leaves you at 48 fps and you can drop that on a 24 timeline and because it is evenly dividable you end up with dropping every 2nd frame which should look ok if the movement / pan is not too fast. Or you slow it down to 40% and you get the 24fps footage, the same as if you were interpreting the footage upfront.
Speed changes instead of interpreting footage leaves you the freedom to change speed of a clip more than once during its duration.
Speed duration instead of interpreting the footage is more like a different workflow which can achieve the same results. I am color marking my original clips according to camera type and original speed to keep a quick overview of my footage.
Fast movements and Panning
Those two are working against all speed changes: panning speed must be somehow fitting the resulting frame rate / timeline. So, watch out for that type of footage and plan ahead what it is used for. Other shot types are not that vulnerable regarding frame rate changes.
Detailed comparison
In the following I am showing how clips work on different timelines:
C008.mp4, original 23.976 file, original length 32 seconds, it has 768 frames
C008.mp4 interpreted as a 29.97 file, now ~25.6 sec long (768/29.97==25.6), but still internally 768 frames.
GOPR0280.mp4, an original 29.97 file, original 19 sec long, it has 570 frames (19 sec x 29.97 frames == 570)
GOPR0280.mp4 interpreted as a 23.976 file, it is now ~23.77 sec long (570/23.976==23.77), internally still 570 frames
The above mentioned LENGTH of the clip, either the original or an interpreted clip will not change if you place them on different timelines. What will change is the number of frames used to accomplish that. See below in all examples, the 32 sec clip is always 32 seconds long but the number of frames changes.
Therefore, you can actually compose a movie on a certain timeline and later drop it to another one. Your movie will still be the same length but all individual clips will perform differently and you likely see a quality change. Some clips improve, some worsen, depending on what the input was.
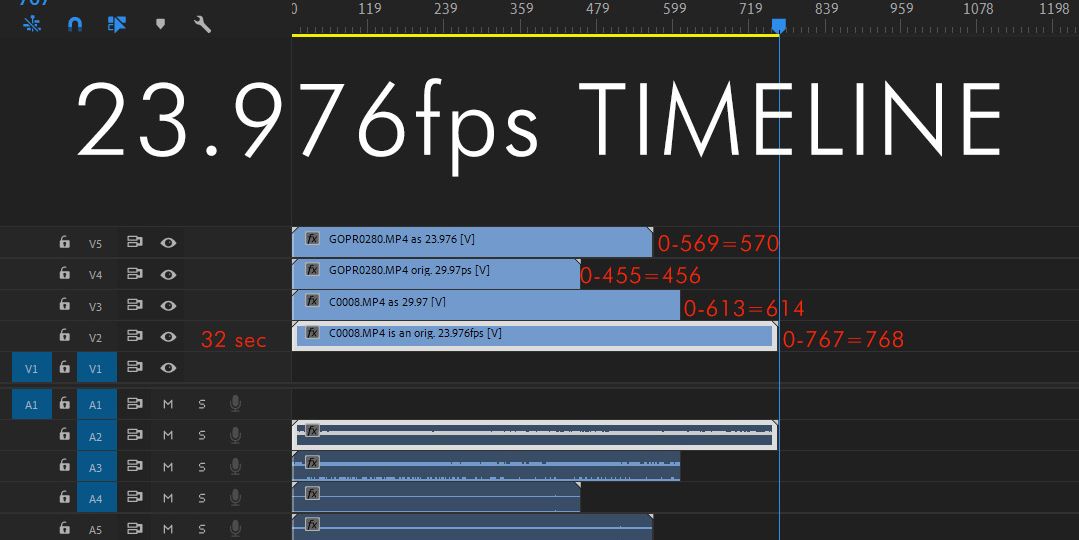
Figure 1: Working on a 23.976 timeline
C008.mp4: as expected full number of frames, original play time
C008.mp4 interpreted as 29.97: When you place this 25.6 sec long clip on a 23.976 timeline you’ll need only 25.6 x 23.976 == 614 frames (frames are dropped)
GOPR0280 (orig 29.97 file with 570 frames): like above, for its 19 sec length on a just 24 fps timeline … only 456 frames are used (19 x 23.976)
GOPR0280 interpreted as 23.976: the interpretation gave it more play time and kept all 570. Result: slightly slo-mo.
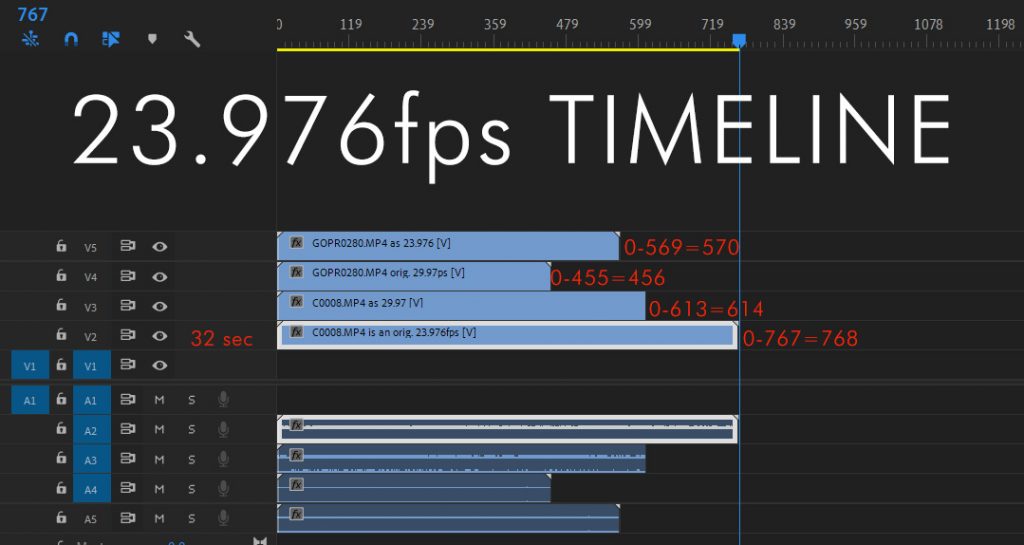
Figure 2: Working on a 29.97 timeline
C008.mp4 (an 23.976 file): to reach full play time it is required to add frames
C008.mp4 interpreted as 29.97: When you place this 25.6 sec long clip on a 29.97 timeline you can use all frames of the clip
GOPR0280 (orig 29.97 file with 570 frames): no modifications, it is a native fit for the timeline and it plays 19 seconds and uses all its original frames: 570
GOPR0280 interpreted as 23.976: the interpretation gave it a new longer length which works on a 23.976 timeline (slightly down slowed) but on this 29.97 timeline there aren’t enough frames for that length, therefore some new frames are added. Result: possibly a loss in quality.
Notable is that the GOPR0280 was basically a ‘real’ 29.97 clip that could perform like native BUT the INTERPRETATION tells Adobe Premiere that this file shall be considered a native 23.976.
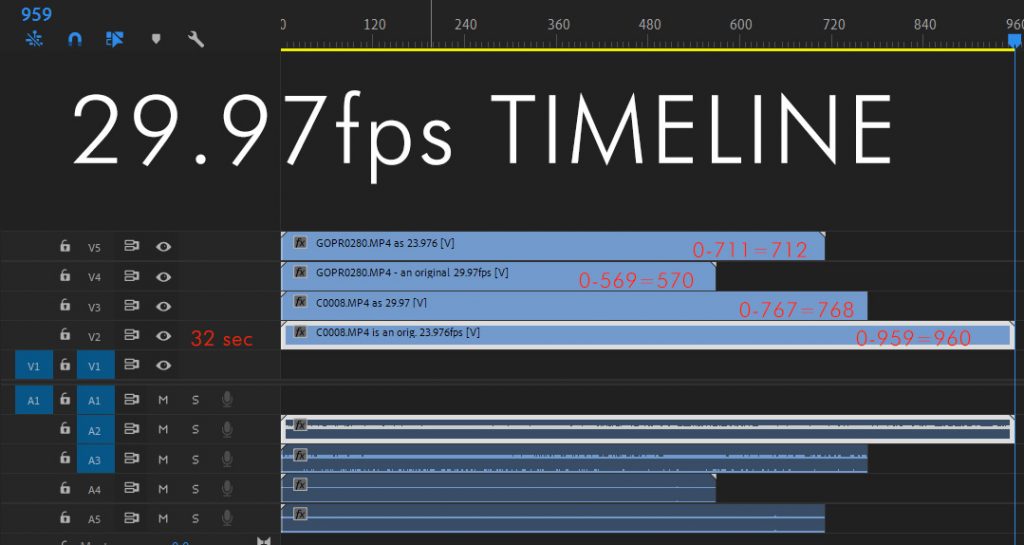
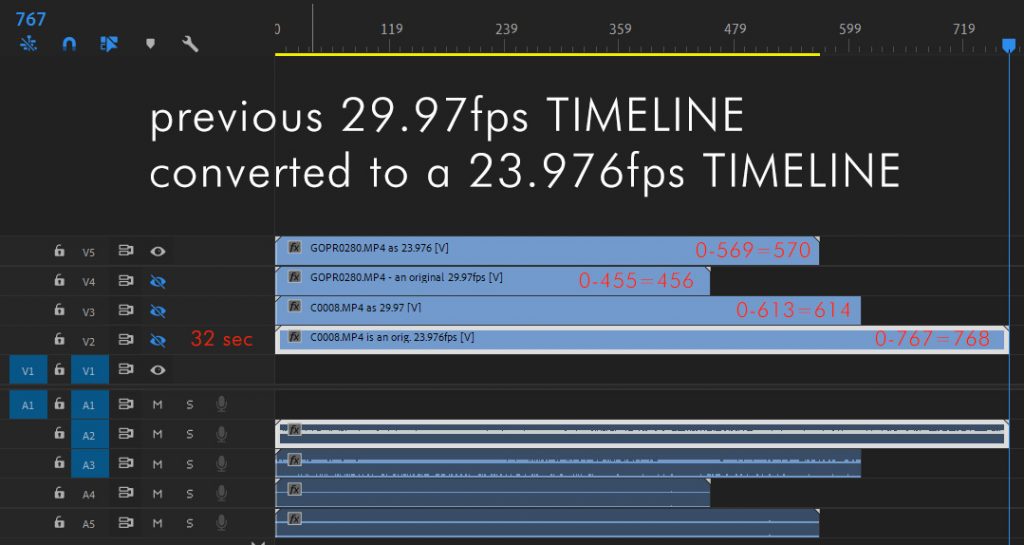
Figure 3: Converting a 29.97 timeline to a 23.976 timeline
Actually all files behave like on a 23.976 timeline, as if you were starting out on that timeline.
Even if that shows you can do that, you need to keep in mind that we have seen that the individual clips, depending what their original state (including interpreted state) is, will perform differently on a different timeline.
A possible effect is that formerly smooth footage is not as smooth any more (look at panning and fast movements).
[…] If you want to know what effects can be expected when using different frame rates on a timeline and how ‘Interpret Footage’ comes into play… here’s an article: Video Frame Rates explained — Interpreting footage and using different frame rates on the time… […]