LUT stands for LookUpTable and is used in color grading to transform an input value (as recorded by your camera) into a desired color value for your output.
DSLR video and dedicated video cameras offer to record video with the highest possible dynamic range and use profiles, e.g. LOG profiles as a setting which does exactly that. I am into the SONY world and this article might refer to S-LOG profiles which are SONY camera profiles but in general other manufacturers have similar profiles.
For example, if you are using DJI drones the settings offer a LOG profile for recording the wider dynamic range — In DJI’s world it is the D-LOG profile. ‘D’ stands for DJI and the ‘S’ in the SONY example stands for … right,… SONY.
Note: Search for camera LUTs on the manufacturer’s website if the LUT is not already included in your video editing software. Or check-out some 3rd-party creators. For example GroundControl (groundcontrolcolor.com) has some promising LUT packages — I haven’t had a chance to try them but used for test purposes their freebie DJI D-LOG-to-Rec709 LUT which is a basic LUT but it can work nicely as a start for DJI D-LOG footage.
Recording with those profiles enables you to record as much dynamic range as possible, however, that recorded material looks ‘flat’ and color grading is required to bring back the color, saturation, brightness, and contrast.
Video editing software like Adobe Premiere or Davinci Resolve (and others) allow color grading of your video material. Color grading is the process of making colors, brightness, saturation, contrast … looking good. Whatever you want the look to be.
You can do Color Grading manually OR you start with LUTS: as the name LookUpTable suggests, recorded input values from the camera are ‘looked up’ and translated into specific colors, saturation, brightness, and contrast values — applying a LUT transforms your image (video frame) into something meaningful, a color graded image.
In the best case you have an immediate result and don’t have to manually adjust values. That is of course almost never happening.
In order for a LUT to work it needs to make assumptions, like the one that you have exposed your footage correctly. Further, a LUT is dependent on the camera used, at least it is working better from the get-go.
There are 3 types of LUTS: Camera LUTS, Software or Creative LUTS, and Tech LUTS. Tech LUTS are e.g. for adjusting monitors etc.. Creative LUTS work across editing platforms and provide a certain standardized Look & Feel, like a certain movie director style or something like that. Camera LUTS are provided from a manufacturer and that is its best guess how you want colors coming out you camera.
So, in theory, LUTs could just be everything you need for color grading and it should be a quick thing to do. The problem is that your footage might not be perfect! Or the LUT is not the ideal thing for your footage and intended look.
Eeven if you shot exposure perfect footage you still want to make adjustments — that is the real world.
LUTs are a perfect start for your color grading: they provide a base and you go from there.
Workflow
My workflow looks like so:
- my video footage is recorded in a LOG format: e.g. on my Sony cameras with a S-LOG2 or S-LOG3 profile and on my DJI Mavic Pro with a D-LOG profile.
Note: other manufacturers have similar profiles - Importing the footage into Adobe Premiere Pro CC or Davinci Resolve.
- Edits & Color Grading (manually and/or with LUTs)
Where to put which type of LUT?
The moment you place a LUT onto your footage the look changes according to the LUT — that’s expected.
But the way it changes the contrast, brightness, and colors depends on
- your clip
- the order / position / stacking order it is applied
Regarding your clip — was the clip well exposed? Was the White Balance set correctly? Basically everything. For example, if you underexposed your shot you will have too dark areas in your input and the LUT works based on that non-optimal input…
Having said that, it makes sense that we think about the order, a.k.a. “at what time in the color grading process do we want to apply a LUT?” of the LUT.
What are the options — where and when could we apply a LUT?


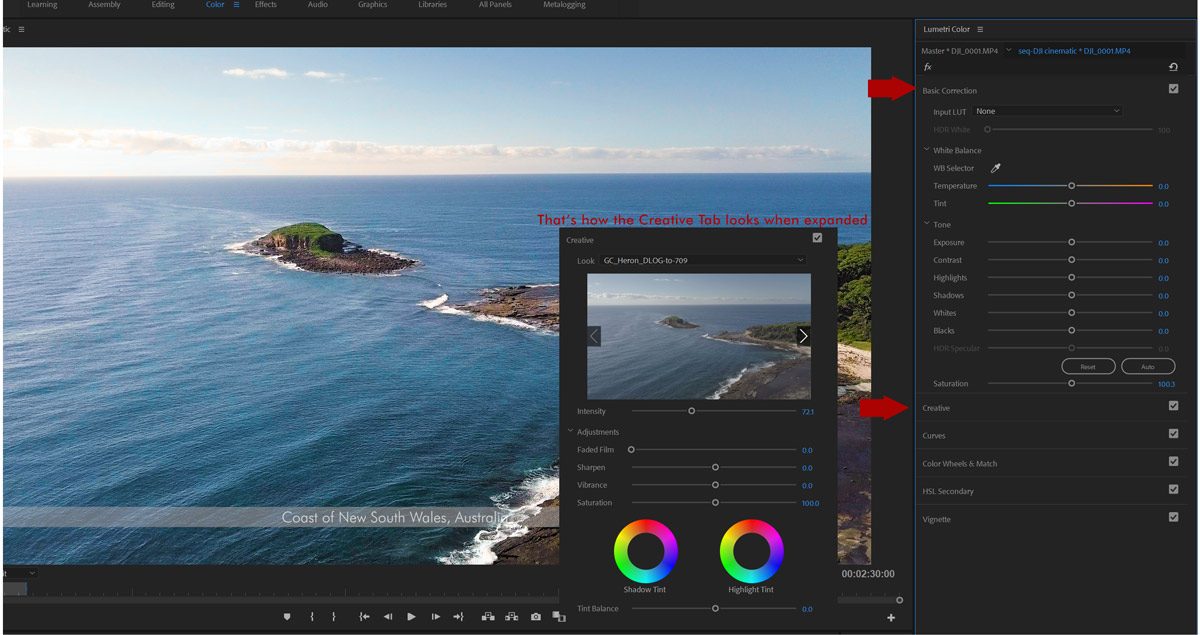
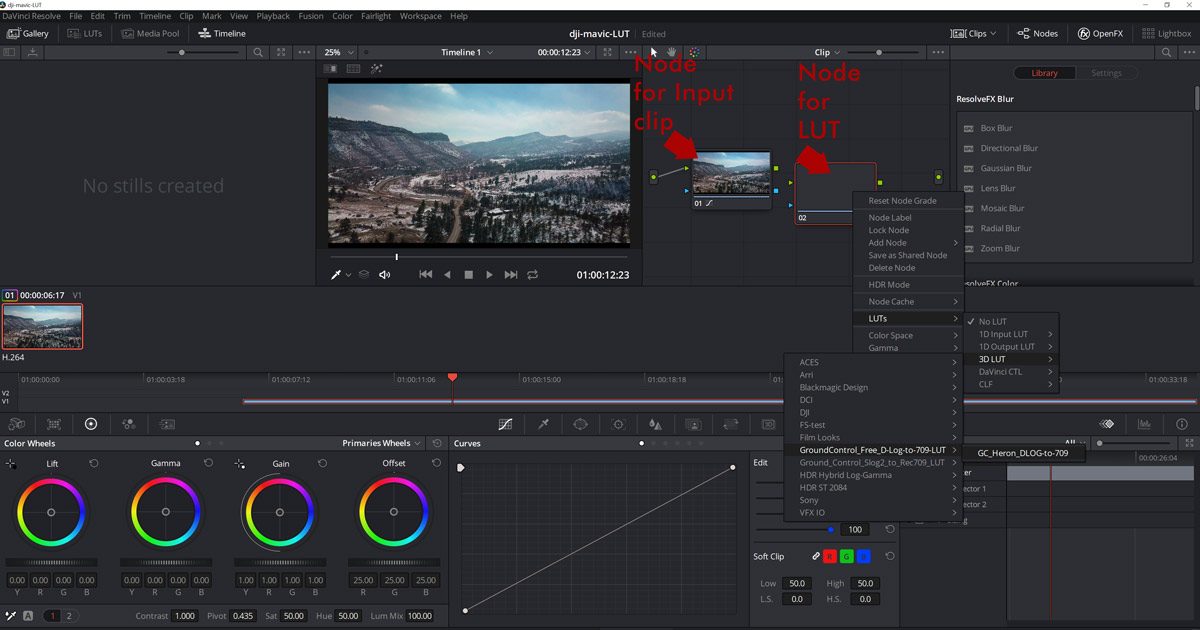
Above you see 2 screenshots demonstrating where to apply LUTs.
In Adobe Premiere Pro CC you will select LUT’s in the LUMETRI Effects panel which is available once your switch to Adobe Premiere’s COLOR workspace.
In Davinci Resolve you would apply LUTs in the COLOR workspace by right-clicking a node and selecting LUTs from the context menu.
a) Before the clip:
Adobe Premiere Pro CC: that is what ADOBE Premiere calls an INPUT LUT, see in the COLOR WORKSPACE under BASIC CORRECTION. That means the LUT is the first thing that is processed for your clip and what you see is the modified input. Everything you change subsequently in BASIC CORRECTION will be applied after the LUT and works based on the LUTs modified input.
Throwing your LUT into the section INPUT LUT works mostly great for Camera LUTs, e.g. if you have a S-LOG2-to-Rec709 LUT for your S-LOG2 footage, then it makes sense to use that as an INPUT LUT. Assuming your footage was well exposed you will likely see an already great result. Details can now be tweaked with the White Balance and Toning settings of BASIC CORRECTION.
Those LOG-to-Rec709 LUTs are targeting todays HD TV monitors and their capability of displaying dynamic range / colors: in simple words: a flat LOG recorded format is translated for a display on standard HD TV according to a standard that is called Rec.709. There’s a newer standard Rec.2020 with a way larger color gamut, however, output devices must be able to support that (which is a long way).
Davinci Resolve: In Davinci Resolve it works basically the same: Resolve uses NODES in Color Grading and nodes actually visualize even better the order of events applied to a clip: assume you have as your first node your video clip. You can now add a new Serial Node BEFORE that clip and apply a LUT and that result will become visible in your clip node. Or you apply that LUT directly to your clip, same result. Whatever you change from here on (in nodes AFTER the clip node) is based on that new modified input.
b) After the clip: In Adobe Premiere Pro CC (workspace COLOR, panel LUMETRI) you have a section called CREATIVE where you find a drop-down menu called LOOK: that is where you can apply a Creative LUT which is a LUT that foremost deals with the overall Look&Feel of your clip, like when you want to mimic your favorite Hollywood movie style. That is why the Adobe term ‘Look’ makes sense: the applied LUT aims at the style of the video and not foremost at the basic correction of your LOG recorded footage.
In Davinci Resolve you would create a new node AFTER your clip node. In that new node you apply the LUT — in this case the LUT transformation works based on the input it receives from the previous node, here in our basic sample it would be the original clip node. Whatever changes you made before in your original clip node (e.g. you changed color hues, or anything else) will be the basis for the LUT.
Conclusion:
All that makes clear that it is very important to determine the best position where you put your LUT. My initial approach is that I commonly would place a camera LUT which deals with my LOG gamma curve BEFORE my clip footage to have a basis to fine-tune the result.
A creative LUT which deals with a certain Look / Style would be better placed after the basic footage corrections are made: first you want to get your input in order, then it makes sense to apply styles to it.
You need to play around with LUTs and place them at the different positions in order to see where you think you achieve the desired result. The above introduction is theoretical and in a real-world project you might find different solutions.
LUTs in general work best with well exposed and white balanced footage. LUTs are camera dependent and the same LUT will produce different result on different camera footage.
LUTs or not?
LUTs are not required for color grading. They might help a lot, however, you can do everything from scratch, manually! Also, you can export your manual color grading settings as your own (or modified) LUT from Adobe Premiere CC and as well Davinci Resolve.

